Sound Hole Mount Replacement System Install Guide for 0.125” Saddles
Introduction
This guide will walk you through the complete installation process. If you have any questions, please contact us. DO NOT force anything.
Navigation
Required Tools
9v battery for the preamp
Drill
1/4” (6.35mm) dowel rod
Sanding materials and shaping tools (belt sander preferred) (only required if you are shaping the Saddle-Pickup)
1/2” open end wrench or adjustable wrench
Slip-joint pliers
Masking tape
Black permanent marker
Pencil
Ruler
Flashlight
acoustic guitar amp or PA system
1/4” guitar cable
Package Contents
Parts Kit

A. Battery Bag
B. Installation mount
C. End pin mount preamp with sound hole controls
D. Cable Guide
E. Cable Strain Relief
F. Installation tool
G. Plastic wire clip
H. Metal wire clip
Saddle-Pickup Kit

Steel-String

Nylon-String
A. Saddle-Pickup
B. Drill Guide
C. 2.8mm Drill Bit
D. Pickup Cables on a spool
Before You Begin
WARNING!!!!
The connectors and cable can be easily damaged during installation.
Make sure you understand the proper handling procedures before continuing.
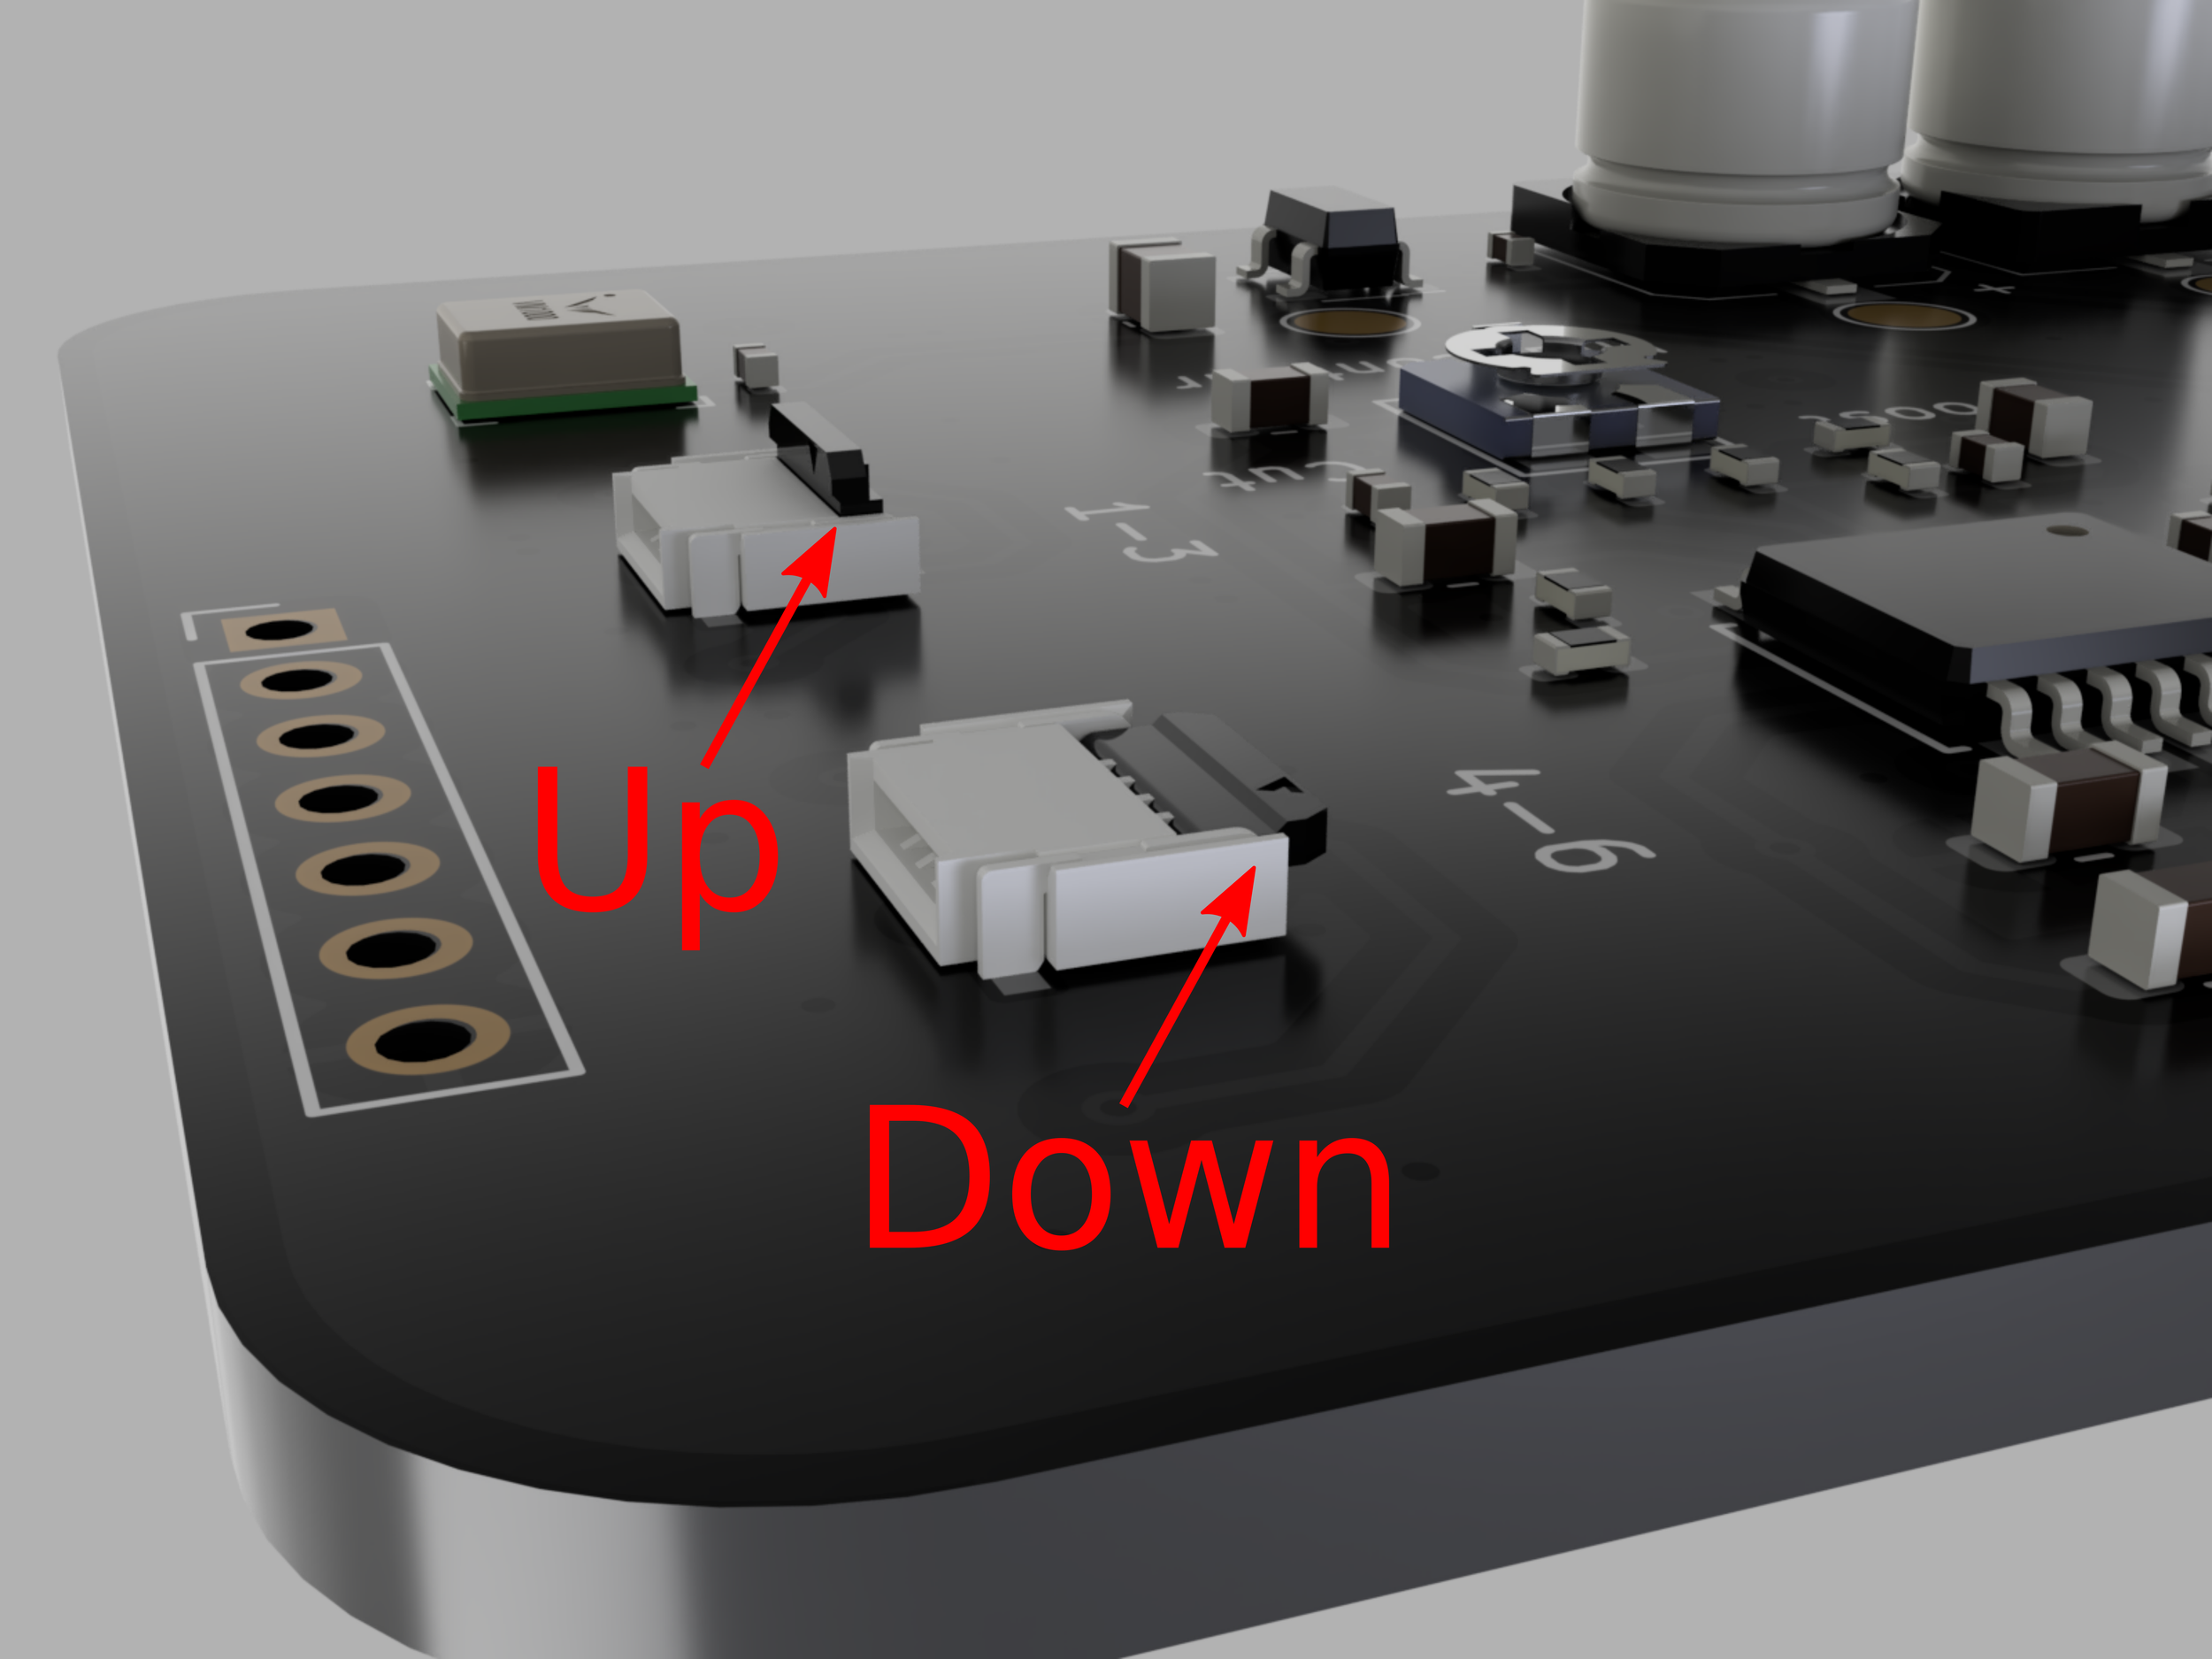
Connector Latch Positions
Make sure you understand the connector latch positions. The same connectors are used on both the Saddle-Pickup and the preamp.
Up: Make sure the connector latch is in this position when you are inserting or removing a cable.
Down: This position clamps down on the cable to hold it securely in the connector. Make sure to push the latches down after inserting the cable.

Inserting the
Pickup Cable
1. Ensure that the cable is oriented properly. The end labeled “Pickup” must plug into the connector on the pickup. The end labeled “Preamp” must plug into the connector on the preamp. The gold side of the cable end faces the access opening on the preamp and away from the circuit board on the preamp.
2. Ensure that the connector latch is in the open position.
3. Gently insert the cable end into the connector. Do Not force the cable if there is resistance. Gently wiggle the cable until it aligns into the connector. When it is properly aligned, it will require almost no force to insert it.
4. Gently close the latch on the connector.
5. Gently pull on the cable. It will not pull out if properly seated with the latch closed.
Removing the
Pickup Cable
1. Gently insert the small end of the supplied installation tool into the small access port behind the flip latch.
2. Gently push the tool further into the access port to push the flip latch open.
3. Gently pull the cable out of the bottom of the Saddle-Pickup.
Once you are sure that you understand how the connectors work, you can begin the installation process.
Preparation
In this section you will prepare the guitar for the installation of the Sound Hole Mount Replacement System.
1. Remove the original saddle and pickup and set aside for measurements.
2. If required, remove the pre-existing pickup system.
3. Ensure that your guitar has the proper end-block hole for the jack
If your guitar already had an end-pin mounted preamp, skip this step.
If your guitar does not have a hole big enough for the jack, please take your instrument to a professional to have this hole drilled. If this is not done properly, it can damage the finish around the jack.
Saddle-Pickup Installation
In this section, you will prepare the guitar bridge for Saddle-Pickup installation. If you have not ordered a pre-shaped Saddle-Pickup, then you will also shape it to fit. Finally, you will install the Saddle-Pickup into the guitar bridge.
0.125” Saddle ONly - Prepare the drill guide by reaming out the holes.

A. Install the provided drill bit into the drill.
B. Hold the drill in one hand and the drill guide in the other.
C. Slowly ream out each hole.
2. Mount the drill guide to the bridge.
0.125” Saddle-Pickup

A. Place masking tape on the bridge between the saddle slot and the bridge pin holes or tie block.
B. With a pencil, mark the centerlines of the two outside strings using the bridge pin or tie block holes.
C. Measure and mark the halfway point between the two outside strings. This is the neck centerline.
D. Insert the drill guide into the saddle slot and align the notch with the neck centerline mark.
E. Tape the drill guide in place.
0.100” Saddle-Pickup

A. Place masking tape on the bridge between the saddle slot and the bridge pin holes or tie block.
B. With a pencil, mark the centerlines of the two outside strings using the bridge pin or tie block holes.
C. Measure and mark the halfway point between the two outside strings. This is the neck centerline.
D. Insert the drill guide into the saddle slot and align the notch with the neck centerline mark.
E. Tape the drill guide in place.
3. Drill 2 cable access holes in the bottom of the saddle slot.
0.125” Saddle-Pickup

A. Insert the drill bit into one of the holes in the drill guide until the bit rests on the bottom of the saddle slot.
B. Press down on the drill guide to keep it from lifting as you drill.
C. Slowly spin the bit and drill through the bottom of the saddle slot.
D. Repeat the process for the second hole.
E. Remove the drill guide.
E. If you purchased a pre-shaped Saddle-Pickup, remove the masking tape from the bridge and skip to Step 6.
0.100” Saddle-Pickup

Each Access Hole requires 3 drill holes in order to create a wide enough hole for the cable to fit through.
A. Press down on the drill guide to keep it from lifting as you drill.
B. Drill the angled holes first. Slowly spin the bit and drill through the bottom of the saddle slot. Make sure to keep the bit straight in the hole so you don’t hit the side of the saddle slot. The notches on the side of the drill guide show you the correct angle of the bit.
C. Drill the vertical hole. Slowly spin the bit and drill through the bottom of the saddle slot. Make sure to keep the bit straight in the hole so you don’t hit the side of the saddle slot.
D. Repeat this process for the second Access Hole.
E. If you purchased a pre-shaped Saddle-Pickup, remove the masking tape from the bridge and skip to Step 6.
4. Cut the Saddle-Pickup to length

A. The Saddle-Pickup is directional. On one side, there are six small vent slots where the white and black material meet. This side faces the bridge pins or tie block.
B. Cover these vents with a piece of masking tape.
C. Mark the center of the Saddle-Pickup on the masking tape.
D. Align the center of Saddle-Pickup to the centerline on the bridge and mark how much length needs to be removed from each end so it will fit in the saddle slot.
E. Grind the ends of the of the Saddle-Pickup to length.
5. Shape the Saddle-Pickup


A. Use the pervious saddle (and pickup if one was installed) as a template to shape the Saddle-Pickup with 120 grit sand paper. If the guitar already had a pickup in it, make sure to account for the thickness of the pickup when calculating saddle height. Only the A and B dimensions shown in the figure may be shaped.
B. After the Saddle-Pickup has been shaped, polish the white part of the Saddle-Pickup using sandpaper down to 1500 grit.
6. Connecting the pickup cables
A. Ensure that the connectors on the Saddle-Pickup are open (the black latches flipped up).
B. CAREFULLY insert the cable end labeled “Pickup” into the 1-3 Saddle-Pickup connector.
C. Use the small blade of the install tool to CAREFULLY flip the latch down.
D. Repeat steps B and C for the 4-6 connector.
E. Mark the “Preamp” end of the 1-3 Pickup cable with a permanent marker. This will allow you to identify which cable is which.
7. Installing the Saddle-Pickup in the Bridge
A. CAREFULLY insert the cables through the holes in the bottom of the saddle slot.
Make sure the cables don’t kink.
Make sure the Saddle-Pickup is properly oriented with the logo facing the sound hole.
B. CAREFULLY seat the Saddle-Pickup in the bridge. Make sure not to kink the cables.
Mounting the Sound Hole Controls and Battery Bag
1. INSTALLING THE BATTERY BAG
A. If your guitar already has a 9v battery bag, skip to Step 2.
B. Find a suitable location to mount the battery bag. We recommend mounting it on the back of the guitar in the upper shoulder where it will be out of sight but easy to reach.
C. Ensure that the Saddle-Pickup cables are out of the way from where you are working inside the guitar.
D. Clean the area so that it is free of dust and oil.
E. Temporarily place a 9v battery in the bag and remove the adhesive liner.
F. Press the battery bag firmly into place using the battery to provide even pressure to the adhesive.
G. Remove the battery.
2. MOUNTING THE SOUND HOLE CONTROLS


A. Ensure that the Saddle-Pickup cables are out of the way from where you will be working inside the guitar.
B. Locate a suitable mounting position on the Low E side of the guitar for the sound hole controls.
Many guitars have a brace near the edge of the sound hole. The controls can be mounted on the brace as long as at least half of the adhesive tape is stuck to it (See photo).
Make sure to pay attention to both ergonomics and the appearance. You don't want the controls to stick so far into the sound hole that they are clearly visible, but you also don't want them to be recessed so much that they are hard to access while playing.
Ensure that there are no braces that will obstruct the cable going to the preamp.
The adhesive is extremely strong, and the controls will be very difficult to remove once they are stuck in place. Make sure you are happy with the location before proceeding.
C. Clean the area so that it is free of dust and oil.
D. Remove the adhesive liner from the sound hole control board and firmly press it into place.
Adjusting the String Balance
In this section, you will connect the Saddle-Pickup to the preamp and then temporarily mount the preamp on the top of the guitar to balance the string volumes and adjust the mid contour.
1. mount the string balancing preamp holder


A. Connect a battery to the preamp and install the battery into the battery bag.
B. Turn the Master Volume all the way up, and the Mic Volume all the way down on the sound hole controls.
C. Mount the Preamp Holder on the High E side top near the waist as shown in the image. Loosen the nut on the bracket, then push down on the nut until the suction cup is flat. Tighten the nut until the bracket is difficult to spin.
2. Assembling the Cable Guide

A. Wrap the metal wire clip around the cable guide as shown in the image.
B. Pull the Saddle-Pickup cables out of the sound hole and run them through the cable guide in the direction shown in the image. The cable guide will be secured later.
3. Connecting the Saddle-Pickup to the Preamp
A. Identify the 1-3 cable which is marked with a permanent marker.
B. CAREFULLY insert the 1-3 cable through the slot in the Preamp Strain Relief, then insert the 4-6 cable through the other slot in the Preamp Strain Relief.
C. Ensure that the latches on the preamp connectors are up.
D. CAREFULLY insert the 1-3 cable into the preamp connector marked “1-3” and push the latch down.
E. CAREFULLY insert the 4-6 cable into the preamp connector marked “4-6” and push the latch down.
F. CAREFULLY slide the strain relief onto the end of the preamp until it friction fits in place.
4. Mounting the preamp in the preamp holder

A. Remove the strap button, small nut, and small washer from the jack and mount the preamp in the jack holder.
B. Reinstall the small washer and nut onto the jack and tighten until the preamp does not spin in the mount.
C. Plug the pickup system into an amplifier.
Tap the Saddle-Pickup to make sure it is working.
Listen to make sure there is no noise or hum. If there is, follow these troubleshooting steps.
Unplug the pickup system from the amplifier.
D. Re-string the guitar and tune.
E. If required, tape the cables to the edge of the sound hole so they do not interfere with the strings.
5. Balancing the Strings
A. Plug the guitar into an amplifier and make sure the amplifier EQ is set flat and the volume is at a reasonable level.
If any strings do not output signal, follow these troubleshooting steps.
B. Play a chromatic scale starting on the low E string and note any strings that sound louder than the others.
C. Referring to the animation, adjust the loud strings down until they are more balanced.
D. Play a chromatic scale starting on the low E string and note any strings that seem to be quieter than the others.
E. Referring to the animation, adjust the quiet strings up until they are more balanced.
F. Repeat Steps B through E until you are satisfied.
G. Play chords, arpeggios, scales, and songs to ensure the guitar response is accurate. Take as much time as you need to get the results you want.
6. Adjusting the mid contour

A. Once you are satisfied with the string balance, adjust the Mid Contour adjustment (shown in the image) until the mid-frequency sound from the amplifier sounds the same as the acoustic mid-frequency sound.
B. If needed, repeat the string balancing process above.
Final Installation
In this section, you will remove the preamp from the balancing mount and install it into its final location. Then you will secure the cables inside the guitar body.
1. Removing the string balancing mount

A. Remove the guitar strings and tape securing the cables to the edge of the sound hole.
B. Carefully pull the Saddle-Pickup cable slack up out of the sound hole and insert a dowel rod through the hole in the guitar end block up to the sound hole.
C. CAREFULLY remove the preamp from the String Balancing Mount making sure not to snag any cables.
D. If the guitar previously had a preamp, set the large nuts on the jack based on their position on the old preamp jack.
E. CAREFULLY lower the preamp into the sound hole and insert the dowel rod into the jack.
F. VERY CAREFULLY lift the flex cables out of the sound hole and keep them under slight tension as you pull the preamp into position (see photo). This will prevent the preamp from snagging on the cables as it goes under the bridge.
2. Tightening the Jack
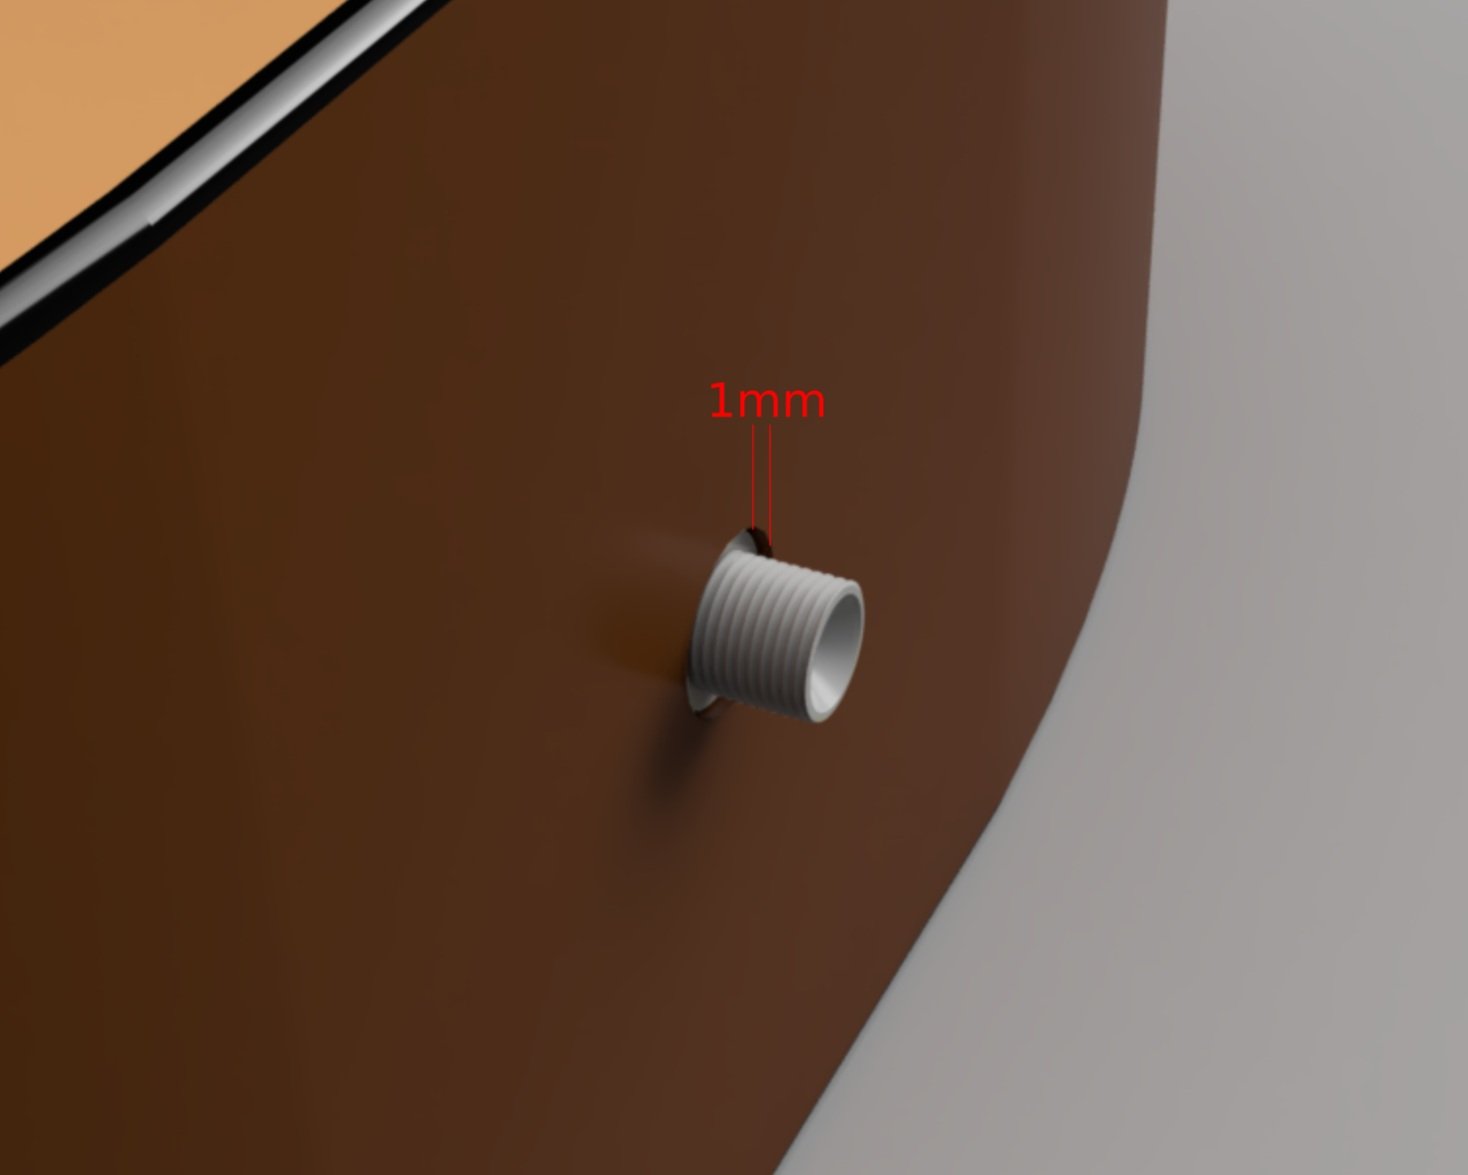

A. Ensure that the large diameter part of the jack is inset 1mm from the side of the guitar (See image).
If not, CAREFULLY push the preamp to the sound hole and adjust the nuts. Then repeat Step 1 part F.
B. Install and tighten the small washer and nut by hand.
C. Fully tighten the nut with a wrench.
Use the large blade of the install tool to keep the jack from spinning as shown in the image.
Tighten the nut until it is difficult to keep the jack from spinning.
D. Install the strap button and CAREFULLY tighten with pliers. Make sure not to scratch the button with the pliers.
3. Securing the control cable

A. Referring to annotation A on the image, locate a suitable location on the High E side of the top for the cable guide.
The location should allow you to push the preamp up to the sound hole without needing to remove the cable guide from its clip.
It should be near the side between the bridge plate and the sound hole.
Make sure the location leaves some slack in the cables.
B. Clean the area of dust and oil.
C. Remove the adhesive liner from the clip and stick it into place.
D. Referring to the annotation B on the image, locate a suitable location on the side for the black plastic control cable mounting clip.
The location should ensure that the cable does not move around and hit the side of the body.
E. Clean the area of dust and oil.
F. Remove the adhesive liner from the clip and stick it into place.
G. Secure the control and battery cables into the clip and squeeze the clip shut.
H. Re-string the guitar and ensure that all the strings are properly balanced.
If something is not right, please see the troubleshooting guide.
Save the spare flex cable, balancing mount, and Installation Tool. Keep these in your guitar case since they may be needed in the future for system maintenance.
Installation is now complete. Restring the guitar and enjoy!